
So I made it through the first week of my exciting new job, and as a thank you to my colleagues, I thought I would whip up a batch or two of cookies. Deep breath. Baking for the first time for new friends or co-workers can be intimidating. It’s certainly not the time to try that new recipe you’ve had marked in Gourmet since last year. No, you can’t waste time fussing around with a finicky recipe or untested new cookbook. You have to make the old stand by-something tested and tested again. I turned to none other than the kitchen rock star Dorie Greenspan and her fabulous World Peace Cookies (so named by a friend of Dorie’s who thought the cookies so good that they could inspire world peace; the jury’s still out on that one).
I made these for the first time last Christmas, and, quite simply, they were a hit, a huge hit. I don’t even like chocolate (yes, that’s right), but these cookies have just the right amount of every ingredient-nothing overwhelms. Perhaps the best part of these cookies is the subtle saltiness that hits you after a few bites thanks to the fleur de sel. These cookies will certainly appeal to people who, like me, don’t enjoy especially sweet foods. The salty and sweet elements sing together in perfect harmony. And if this weren’t enough to sell you on running home and baking them, they have a melt in your mouth goodness that I struggle to find the words to describe.
In addition to their wonderful flavor, they are a snap to make (beware: they do have to chill in the refrigerator for three hours before baking). The recipe is very conventional: whip air into the butter, add the sugar to the butter and cream the two together, then add the previously sifted dry ingredients. Careful not to mix the dough too much once the flour is added, lest you risk a tough cookie (no pun intended). Roll into a log, chill, slice, and finally, bake. Two things to note: 1) once the cookies are chilled, slice them with a very sharp, thin knife. The chilled dough does have a tendency to crack. No worries, just push the cracked bits back together. The baking process will smooth out the lines perfectly 2) don’t bake the cookies longer than the twelve minutes. Dorie notes in her recipe that the cookies won’t look done. Trust her, they won’t. Fight the urge to bake them any longer. They will continue to cook a bit while they are cooling. Twelve minutes-perfection every time.

Critique, you’re wondering? Honestly, I can think of nothing to alter. The dough comes together beautifully. The flavor and crumb are lovely. The only thing these cookies need is a tall glass of milk.

I baked these cookies on a slow Sunday night, which also served an ulterior motive: freedom from Sunday night loneliness. What’s a girl to do when her spouse is in a distant town and she’s alone in a new city? I can think of no better remedy than baking cookies. S (my previously mentioned husband) is back in Nashville finishing up some things, and I’m here in Charlotte. A whole new city is out there for me to explore, but there’s something wonderfully comforting about staying in and baking something familiar. So to the kitchen I turn. Should you find yourself with nothing to do on a Sunday night (or any night for that matter), try your hand at Dorie’s World Peace Cookies. You won’t be disappointed.
World Peace Cookies
Dorie Greenspan, Baking: From My Home to Yours
Ingredients
1 ¼ cup all-purpose flour
1/3 cup unsweetened cocoa powder
½ teaspoon baking soda
1 stick plus 3 tablespoons (11 tablespoons) unsalted butter, at room temperature
2/3 cup (packed) light brown sugar
¼ cup sugar
½ teaspoon fleur de sel or ¼ teaspoon fine sea salt
1 teaspoon pure vanilla extract
5 ounces bittersweet chocolate, chopped into chips
Sift the flour, cocoa, and baking soda together.
Working with a stand mixer, preferably fitted with a paddle attachment, or with a hand mixer in a large bowl, beat the butter on medium speed until soft and creamy. Add both sugars, the salt, and vanilla extract and beat for 2 minutes more.
Turn off the mixer. Pour in the dry ingredients, drape a kitchen towel over the stand mixer to protect yourself and your kitchen from flying flour and pulse the mixer at low speed about 5 times, a second or two each time. Take a peek – if there is still a lot of flour on the surface of the dough, pulse a couple of times more; if not, remove the towel. Continuing at low speed, mix for about 30 seconds more, just until the flour disappears into the dough – for the best texture, work the dough as little as possible once the flour is added, and don’t be concerned if the dough looks a little crumbly. Toss in the chocolate pieces and mix only to incorporate.
Turn the dough out onto a work surface, gather it together and divide it in half. Working with one half at a time, shape the dough intol logs that 1 ½ inches in diameter. Wrap the logs in plastic wrap and refrigerate them for at least 3 hours. (The dough can be refrigerated for up to 3 days or frozen for up to 2 months. If you’ve frozen the dough, you needn’t defrost it before baking – just slice the logs into cookies and bake the cookies for 1 minute longer).
Getting Ready to Bake
Center a rack in the over and preheat the over to 325 degrees F. Line two baking sheets with parchment or silicone mats.
Using a sharp thin knife, slice the logs into rounds that are ½ inch thick. (The rounds are likely to crack as you’re cutting them – don’t be concerned, just squeeze the pieces back onto each cookie). Arrange the rounds on the baking sheets, leaving about 1 inch between them.
Bake the cookies one sheet at a time for 12 minutes – they won’t look done, nor will they be firm, but that’s just the way they should be. Transfer the baking sheet to a cooling rack and let the cookies rest until they are only just warm, at which point you can serve them or let them reach room temperature.

What do you make for a work potluck that is thrown in honor of a departing colleague and friend who really hates potlucks? Well, it can’t be covered in mayo, and it shouldn’t be stewed beyond recognition, and it really can’t be covered in marshmallows. It has to be an anti-potluck dish. For this Seinfeldian dilemma one thing stuck in my mind – Babka.
And clearly this Babka had to be chocolate – there would be no inferior Babka made for this potluck.
I managed to find a Babka recipe that looked like the ones I remember from New York in Gourmet, but in reading through the online comments section, I was inspired to add a little almond paste to the recipe. Tempting fate? Perhaps – but with almonds and chocolate, really what could I mess up?

The dough itself was like no bread dough I had ever made before. Made with milk and eggs and 11 tablespoons of butter, the dough was shiny and sticky and looked like batter. But it rose – and, with the help of a lot of flour, it spread out to become a rectangle. After I spread the soft butter on the dough, I began flaking on some almond paste. My theory was that it would melt into the butter and chocolate – and it did, for the most part. A sprinkling of sugar on top of the chocolate and I was ready to try the twist.

A double figure eight is how the recipe described it, and – for the first Babka – I managed it perfectly. The second – not so much. But messy Babka is not the worst thing in the world. A second rise, 40 minutes in the oven later, and the loaves came out golden and shiny. My apartment smelled like the best bakery in the world and it was pure torture looking at them and not being able to taste. So at 11 at night I gave in and cut one slice – delicious!

It seemed to go over well at the potluck as well. Few people at my work place seemed to know exactly what Babka was, but that’s Nashville for you. All in all it was a fitting farewell anti- potluck dish. So long E – we’ll miss you!
www.epicurious.com/recipes/food/views/236707

How do you celebrate the beginning of a food blog? A blog that will be dedicated to celebrating good food and drink… a blog that will reflect the far flung roots of the contributors, but respect the fact that the mid-south is their current home… a blog that delights in beautiful restaurant food, but also appreciates a good burger or hot dog… and above all else a blog that aims to elevate delicious home cooking…
Only one thing made sense – Biscuits and Champagne.

For our inaugural meeting of the 3 of us, J, E, and S, we gathered at J’s home with her sparkly new kitchen. I had never managed to make a good biscuit in almost three years in the south, and I attributed this to the fact that I was born in New York and have never lived further south than Washington, DC until I moved to Nashville in 2005. But E, a born-and-bred Kentuckian, claimed that good homemade biscuits were not the Holy Grail – they were much easier to make than I thought. Obviously, I needed to be taught. We began by working with the biscuit recipe of that Grande Dame of southern cookery, Edna Lewis. The shortening was chilled and cut up, and the buttermilk was full fat – clearly we were ready to begin.
The key – which I’d heard many times before, but apparently misunderstood – is not to work the dough too much. When the batter comes out of the bowl it looks extremely loose and wet. As such, there needs to be copious amounts of the flour on the surface to eventually be able to get a smooth expanse of dough. We had forgotten about a biscuit cutter, but the hand cut squares gave the biscuits a rustic feel. The biscuits came out golden brown and aesthetically they went perfectly with the bean stew that J had prepared.

The biscuits themselves – they were tender, tangy and tasty. We saved a few for our spousal units, but devoured the rest as we drank the pink champagne. The perfect balanced meal. Now the question will be: Can this New Yorker replicate this at home on my own? I can do the champagne part, but we’ll see about the biscuits.
So welcome to our food blog – cheers y’all.
The Best Biscuits
Makes 12
Scott Peacock got this delectable biscuit recipe from Edna Lewis, the legendary Southern cook and his mentor.
Ingredients
- 1 1/2 cups all-purpose flour
- 1 1/2 teaspoons single-acting baking powder or double-acting baking powder (see Note)
- 1/4 teaspoon baking soda
- 1/2 teaspoon salt
- 1/4 cup cold lard or vegetable shortening, cut into pieces
- 1/2 cup buttermilk
- 1 tablespoon unsalted butter, melted
Directions
- Preheat the oven to 450°. In a bowl, sift the flour with the baking powder, baking soda and salt. Using your fingers, work in the lard just until the mixture resembles coarse meal. Stir in the buttermilk just until moistened.
- Turn the dough out onto a lightly floured work surface and knead 2 or 3 times. Roll out or pat the dough 1/2 inch thick. Using a 2-inch round cutter, stamp out biscuits as close together as possible. Transfer the biscuits to a baking sheet. Pat the dough scraps together, reroll and cut out the remaining biscuits; do not overwork the dough.
- Pierce the top of each biscuit 3 times with a fork and brush with the butter. Bake the biscuits for 12 to 14 minutes, or until risen and golden. Serve at once.
MAKE AHEAD The unbaked biscuits can be frozen in a single layer, then kept frozen in an airtight container for up to 1 month. Thaw before baking.


We, the researching foodies that make up Kitchen Confit, headed into the weekend without any ideas of what we would make at our Tuesday gathering. That of course was until Monday Morning, when I shared my fascination with the Chocolate Bread Pudding with Bourbon Caramel Sauce from the April 2008 issue of Food and Wine Magazine. Having a small child means my reading time is more limited than before, but on that Sunday night I finally found time to pour a glass of wine and devour the entire issue.
We weren’t able to get a challah, so we used brioche instead. I think in my haste we might not have cooked down the bourbon sauce enough. The bourbon flavor was sharp, which might not be good for some guests. I will say having six hands made this recipe quick work especially when making the caramel.
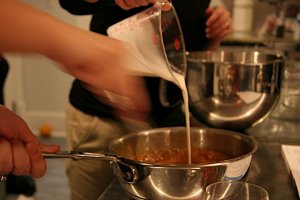
I whisked the sugar mixture, S added the cream, and E took pictures. Next time I need to more evenly distribute the chocolate custard because we ended up with a few pieces that were not soaked in chocolately goodness.
The end result was everything I hoped it would be…lots of bittersweet chocolate, bourbon and caramel. So another fattening adventure that ended up with lots of bread pudding to take home for a little late night snacking, or post lunch feasting.

The link to the recipe follows…Cheers!
Chocolate Bread Pudding with Bourbon Caramel Sauce


